Wednesday, January 2, 2013

Driving, problems and rework

Been a while since I have updated, but I have has the car moving under it's own power.  Sorry I don't have any video will try to get some soon.  Here is a picture of the first drive without the front body plastic installed.


The end of November I went for my first drive around the block and up and down the street a few times.  The first problem I had was the DC-DC controller fuse blew, draining my 12 volt battery, shutting down the controller leaving the car dead in front of the house with all the neighbors watching.  Shutting everything down allowed the battery to recover enough to get back in to the garage.  Looking on line I found this was a common problem and is either caused by the capacitors in the DC-DC converter trying to drive the car when the main pack sags or by an AC ripple on the DC high voltage caused by the controller.  I installed a diode to prevent the capacitors from back feeding and a 100 uH inductor to kill any ripple.  I also changed from a 10 amp fuse to a 15 amp fuse. With about 50 miles on the car since I have not had any more problems.

The next problem I ran into was not having enough heat.  At 20 degrees the amount of heat  was enough to keep the windows from fogging and make it tolerable to drive.  The problem was there was not enough heat to melt frost off the outside of the windows.  This is kind of important in the winter in Iowa.  So I decided to re-do the heater.  I decided to use a couple 1500 watt PTC heater elements that I removed from heater I found at Home Depot for $20 a piece.


The problem is getting to the heater core.  The entire dash has to come out of the car along with the structural cross bar.  Working in the unheated garage, with one of the heater running inside the car, it took me a day and a half just to get to the heater core.   The heater core slides down into the black square in the center of the photo below.


Once I got the heater core out it was time to modify it to hold the PTC elements.  Taking a grinder and pliers to the heater core made room.  I stacked the two elements and held them in place with some fire block expanding foam.  Then sealed up the rest of the fins and small holes with some high temp RTV.  The final heater core ready to be re-installed is below, with the scraps of aluminum that were removed from the heater core in the back ground.


I have the heater core back in and wired but I had to order a new switch that will be installed in the dash to control the heaters.  I will have a low and high settings for 1500 and 3000 watts.  So the dash panel will stay out until I get the new switch.

After hearing more about bad things that can happen to Li-Po4 cells when they are charger below freezing, I decided to add some battery box heaters.  I found some flexible silicone rubber heaters on line at Omega.


SRFR and SRFG Series : Flexible Silicone Rubber Fiberglass Insulated Heaters

I have these hooked up to 120 volt AC plug to connect when I pull in the garage   Even at 2 watts per square inch I found they get very hot.  To disperse the heat I attached these to a piece of 0.063 aluminum under each battery pack between the insulation and the battery and connected them through a cycling relay that turns them on for a minute and off for a minute.  From 20 degrees they get the batteries up to about 45 degrees in about 3 hours.

I also did a little body work on the car.  Like most ICE cars, there was a cutout in the back for that tail pipe.  Since I don't have a tail pipe it looked silly to have a cutout.  I used some fiberglass cloth and resin to fill the hole and covered the panel with some foe carbon fiber.  I think it make it look much better and I'm sure will cut 2 seconds off my 0 to 60 time.


Sunday, November 4, 2012

DC-DC Charger

The Belktronix DC-DC converter finally showed up.  For those who don't know the DC-DC converter connects to the 160 volt traction battery pack and convert the voltage down to 12-14 volts that the rest of the normal car stuff runs on, things like the lights and radio.  This is not the best looking part I have got for the Audi TT but it comes with a lots of recommendations and promise for years of trouble free operation.  Since the web site for Belktronix has very little info on the real mounting size, I had to wait until the DC-DC converter showed up.  With the unit in hand I was able to find a place under the hood and build a simple mounting plate.


To handle peek loads higher than the 50 amps that the DC-DC converter can put out, I'm using a four 15 amp hour cells.  To mount the battery pack, they will be tie-rapped to a simple support bracket.  After they get bottom balanced they will be short proofed.


Three of the battery boxes will have aluminum covers, the fourth and most accessible battery box has a Lexan cover to allow the curious to see the batteries and still make them touch safe.


Next up will be running in the motor and bottom balancing all the cells.

Monday, October 29, 2012

Charger Install

I have been making slow progress as parts arrive.  This week I got my charger from China.  I always planned to put it in back laying flat where the spare tire normally sits.  After looking at the large hump where the spare sits I had two choices, 1. get the cutoff wheel out and start some modifications or 2. find another location.  I chose the latter decided to mount the charger on the back sheet metal of the car.  The spare still does not fit but the jack and all the other tools that come with the car fit.  If I get a flat it will be a call home for someone to bring me the spare or a call to AAA for a tow.


I wired the charger through a 250V 30 amp plug and outlet in the car which gives me the option of using an extension cord and standard outlet rather  than a J1772 charge station.


The rear interior parts have been modified to fit around the charger.  The charger should be able to cool alright with half the fan above the floor and half below.


Having the full baggage area available to groceries or whatever else need to be hauled should make the car more practical that having the trunk filled with batteries.  I'm still going to have to do some interior work to cover the battery boxes, thinking some gray fabric will get them to match and blend into the rest of the interior.


I also got my J1772 charge station from Home Depot on-line.  I plan to hard wire it into the garage electrical at some point later when I have time to pull a permit and have it inspected.  For now I have it wired into an existing 240 Volt outlet and hanging on a spare 2X4.  


I like the look of the J1772 plug on the old gas cap hole.  The fight was a little close but everything clears without touching.  Note for anyone installing a J1172 plug in a car, the latch side need more clearance.


To test the charger I had to get all of the batteries strapped together   Since I bought the batteries from Jack at EVTV they came with the braided straps, stainless bolts and Nord-lock washers


With the pack all connected I was able to start testing some of the high voltage parts of the system.  I got the JLD404 meter programmed, but ran into a problem.  The shunt inputs and voltage inputs have a common negative input.  I wired the shunt to the most passive terminal of the battery pack so the volt meter reads negative.  Not sure what I will do, or if I will do anything. 


The second problem I ran into was the heater not putting out enough heat.  I reused the temperature switch that came with the heating element, but I think it has a shutoff temperature of about 115 degrees F.  I get heat but I think it would take forever for it to clear frost off the window.  I ordered a new switch that had 210 degree shutoff temp, that should get the water close to what the engine would have been putting out when it was warmed up.  If this does not work, the dash will have to come out and I will go to a ceramic heater element.

Wednesday, October 17, 2012

Solition, Heater and Gauges

Been a while since I have updated the Blog here, I have been making some progress but I seems very slow with lots of standing back an thinking things through.

I did get my Soliton 1 controller from EV West along with 40 feet of 2/0 orange cable and various size lugs.  The controller is mounted in front of the battery box.  To keep this beast cool while controlling a 1000 amps it requires liquid cooling.  I got a overflow tank from Summit Racing to use as a reservoir.


Tucked down under the battery box is the pump that will circulate the coolant through the system.  The pump is normally used for solar water systems.  I have a transmission cooler that I will use as a radiator to keep things cool.  The pump will run off a relay triggered by the Soliton controller when it starts to get hot.


To run the big cables between the front of the car and the back, I am using a 2" plastic conduit under the car.  It is bolted with a couple of clamps from the EV section of Home Depot.

Since I live in Iowa and plan to drive the TT year round, I will need heat.  I started by seeing what it would take to replace the heater core in the car with ceramic heater.  After reading some horror stories on the Internet about people spending weeks to replace the stock heater core because the entire dash has to be removed I started looking at other options.  I ended up with a parts from a on demand electric hot water heater.  The heating element is a 3.5KW version, I added a contactor to control the DC high voltage and another small water pump along with various plumbing adaptors to connect everything and get 3/4" fitting for hoses going to heater core.

I mounted the heating contraption to the back of the battery box.  I had planned on putting it all in a box but I'm just running out of room.  I'm thinking if this does not produce enough heat or when it fails I will go back to the ceramic heater idea to clean this mess out of the engine compartment. 


Inside the car things are also moving along, I installed the pack cutoff switch in the back seat, this is more for making the car safe to work on than an emergency cut off switch but it can be easily reach from the drivers seat if needed. 

Inside the battery box is a Zeza fuel gage driver.  The Zeva used a hall effect sensor to count amp hours in and out of the battery pack and drive the stock fuel gauge.  It will also be used to send a signal to the controller to limit the controller output when the battery pack gets to low.  This little circuit board also can drive the tachometer to display amps being used, not sure if I will use this function or not but I have the wire run under the dash just in case.

There is also a 800 amp shunt connected to the disconnect switch for another meter.

The amp meter that is connected to the shunt is a JLD404 from Light Object and supports a bunch of functions.  It will display Amp, Volts, Amp Hours and has two relays that can be programmed to open or close based on any of the inputs.  I will use the Amp Hours to calibrate the Zeva, use the Amp meter while driving and the volt meter and relay during charging.  Although the charger will be programmed to shut off at a specified voltage, the relay will be a backup to kill power to the charger should it go over the programmed voltage by more then 5 volts.  The gauge was mounted in the back of the little hiding box that is part of the center console.  The lid slides back to cover everything.

I'm still waiting on my DC-DC converter and Charger to show up.  That should be close to the end for big parts.  I will try to update soon but I'm getting excited to get things moving and forget to take pictures.

Monday, September 10, 2012

Vacuum Pump and Power Steering

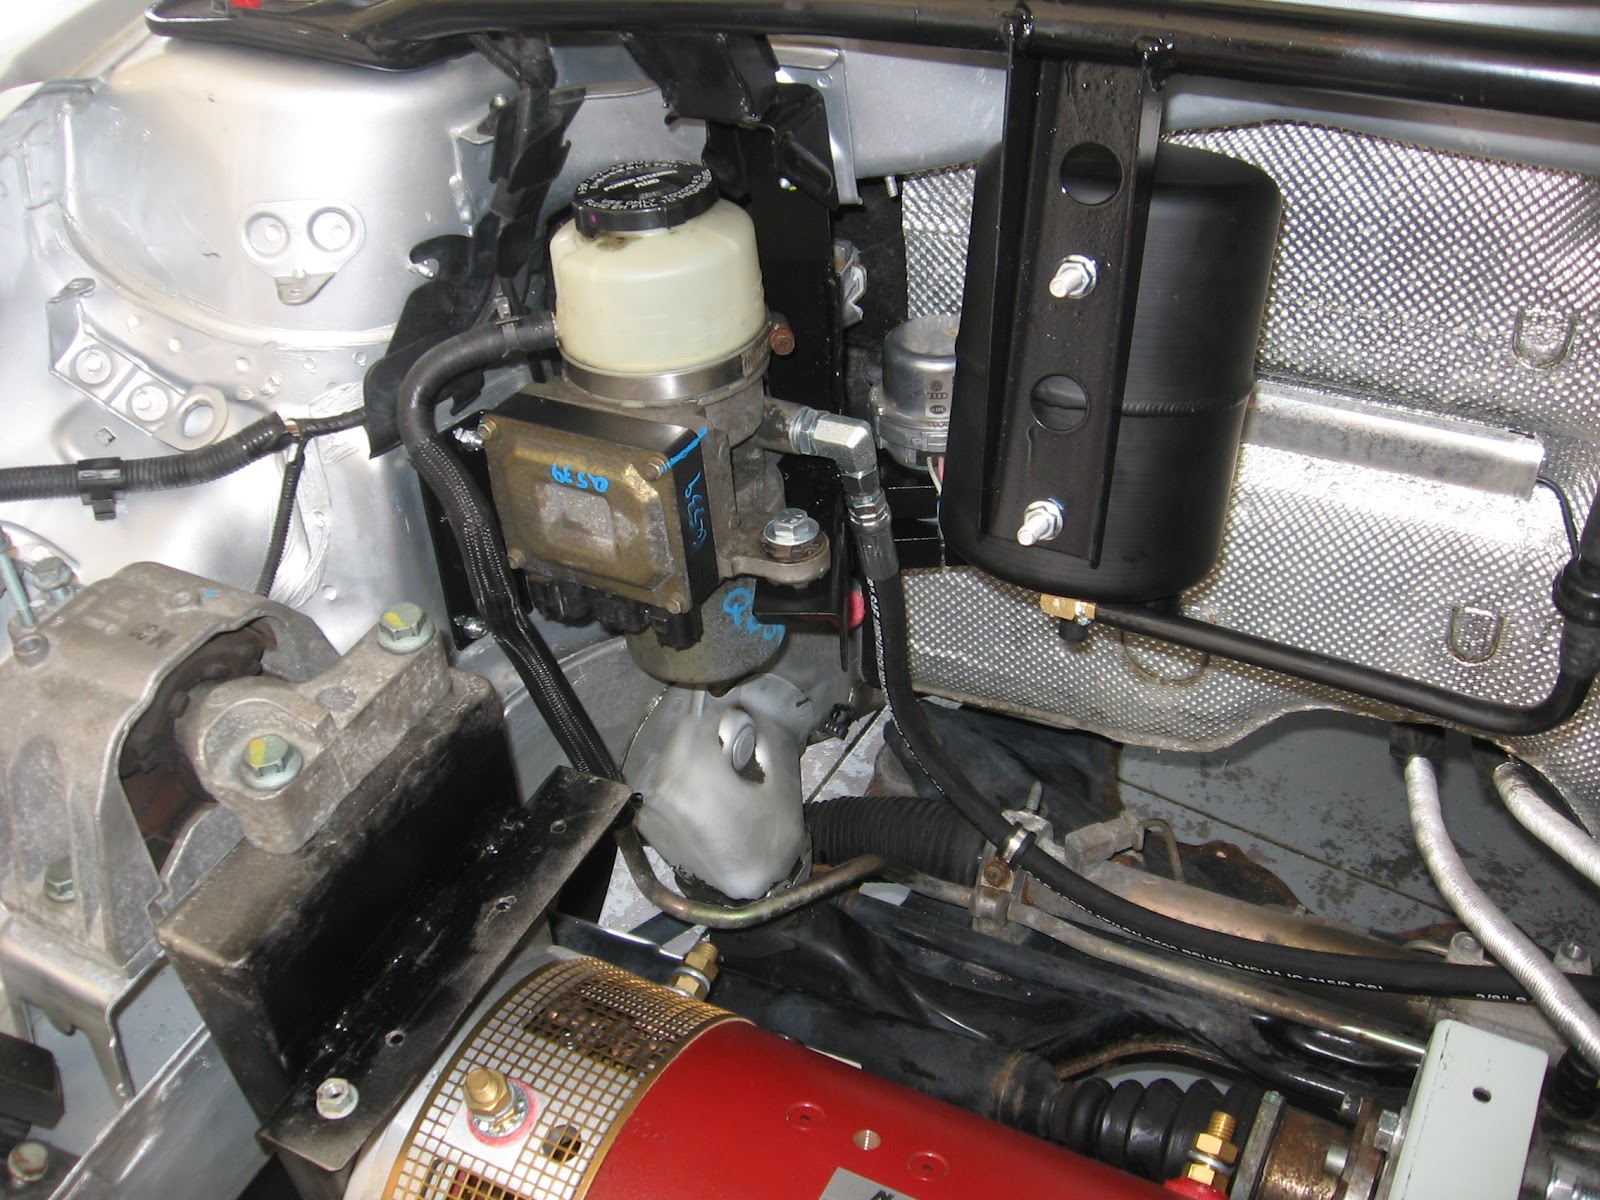
I had some vacation to use before the end of September, so I took the week of Labor Day off and spent most of the week working on the car.  Spent a lot of time but don't have much progress to show.  I mounted the electric power steering pump from a 2003 Toyota MR2.  I got it off Ebay and found a wiring diagram that shows how I  plan to hook up the unit.  One morning was spent at a hydraulic hose shop getting the pressure side hose and fitting to mate the Audi and Toyota parts.  The mount took much longer than I though it would but it tucked away nice and is solid.  I have not put fluid in the system yet so I am hoping for no leaks.


I also mounted the vacuum pump to the same bracket.  The vacuum pump I used was from a 2002 VW Passat.  I also used a Comp Cam vacuum canister from Summit Racing and a vacuum switch to activate the pump so that it only runs when more vacuum is needed.  To mount the pump I used a couple clamps that are intended to mount things to a roll bar, just so happened that the pump motor has a 2" diameter.  Using some grommets and spacers from the local hardware store I was able to isolate the unit to minimize vibration that is transmitted to the car. 


Work on the battery boxes continues, I think I'm done riveting now.  I have the 1/2" insulation cut and installed. Gland Nuts installed on most of the boxes.  I sealed up around the rear seat box using some sticky window flashing that I got from Home Depot.  More batteries to be installed but you get the idea on the layout.


 Front box is bolted in for good now. 


With the front grill support installed, the front three batteries are where the radiator was.  The front of the battery box will be painted black so that it will not show behind the grill.


I also got my J1772 connector installed under the fuel door.  If a public charge station ever get installed in Iowa I will be able charge from it.


Tuesday, August 28, 2012

More Battery Placement

I know it's been to long time since I have updated the blog.  I have been busy with non-EV tasks.  I have managed to get some stuff done.  I got rear battery hole cut.  The picture shows emergency break cables and how they were routed around the fuel tank.  So, no changes will have to be made to them to go around the battery box.  The lip at the front of the opening is actually a boxed section that I'm sure provides lots of stiffness to the body so I did not want to cut into that area.


Looking towards the back you can see part of the rear suspension that prevented me from having the hole any larger going back.  The black rear break lines are also visible, they did have to be re-routed slightly, just some hand bends and a new clap to make sure they would not rub on the battery box.


The next couple pictures show how the rear batteries will be placed in the battery boxes.  The support for the battery box has been installed.  It is a simple structure made up of some steel strap and angle that hangs the batteries from some of the beefier parts of the Audi structure.

Looking under the car, the angle makes it look like it hangs down but it is actually about an inch higher than the floor.  I may make a belly pan to prevent snow from getting packed around the batteries in the winter.


I made another mount that bolts to the adaptor plate for the over the motor battery box..  A battery box will sit between the far motor mount and this angle.


The wood is temporary to make sure the batteries fit.  Battery box will span the same area. 


Checking for clearance, with an inch and a half of wood there is still a gap between the battery and the hood.  This will give room for the added height of the battery box.

I picked up some 0.080 5052 aluminum sheets from Storm Steel, a local metal supply shop, to make battery boxes.  Thanks to Doug for his help and the use of this well supplied shop, we sheered and bend up the battery boxes in an afternoon.


Doug has a really well supplied shop, he offered to pre-drill rivet holds in the end caps using his CNC mill.  This was a quick way to get a dozen holes with 1 inch spacing.  It's good to have tools but it's better to know someone with tools who knows how to use them.

Rear battery box riveted together and sitting in place.  I used AN426 and AN470 rivets that I had leftover from when I built my RV-8 airplane.  The rivets on the bottom of the box are countersunk AN426 so the boxes would sit flush.  Rounds head AN470 rivets were used on the sides.  I had fun bucking rivets again, maybe I need to build another plane?  I still need to make mounts to support the front edge and something to tie into the old seat belt attach points.


Another shot of the box and the tight fit to get 13 batteries across the little TT.


Still working on the front battery boxes, Lower front is almost done, needs the added 3 cell pouch on the front.  The over motor box still needs the end caps installed. 

My parts pile is getting low, I need to order parts to get Audi power brakes and power steering functional again.  Until next time.


Friday, August 10, 2012

Registration and More Battery Placement

7 weeks after buying my little TT from a Dealer in Minnesota, I finally received the title this week.  I had a little dilemma of what to do about the registration since the easiest thing would be to register it as a gas vehicle but there is no gas motor in the car and all the gas parts have been removed.  After doing some research, I went to the county treasurer to register the car and see what my options were.  I arrive at 8:00 as they were opening, hoping the clerk would be in a good mood.  She was but of course she had no idea how to handle an electric conversion.  After asking around, no one else in the office know either, she got on the phone to the head office in Des Monies.  I was expecting to get a response that the car has to be inspected  to verify that it is electric.  Nope, just a written statement from me stating that the gas components had been removed and electric one installed. She even went and got me a piece of paper to write the statement on.  Then came the registration fee, Iowa Code section 321.116 states that electric vehicles older than 12 years have a $15 registration fee.  Of course the computer did not agree right away and required another parameter under the VIN to be manually changed.  Everything agreeing, I walked out 30 minutes later with my Electric Vehicle title.


One note, that someone in Iowa does not like the reduced registration fee for EVs and the legislature is trying get section 321.116 removed so EV's pay the same registration as everyone else.  My registration going up to $50 is not going to impact me but a new Nissan Leaf owner's registration would go from $25 to around $450 every year.  If you in Iowa, write your Representative and ask them to support this fledgling industry.  One of the things I found was a Fiscal Note on the bill, and it states that as of February 2012 there were 13 electric vehicles register in Iowa.  There are 4.1 million cars registered in Iowa, 0.0003% are electric.  The estimated revenue gain from the law change would be $1300 per year.  If they added $0.01 to all the registrations they would have 40 time the revenue.  I'm sure the Fiscal note to look into the revenue gain cost  more than $1300. 

Since the clerk was so helpfully and pleasant to deal with, I let her know that she could now claim that she had registered 5% of all the electric vehicles in Iowa. 

I also got a little work done on the car this week.  Just a little since there was a lot of head scratching on battery placement.  My initial plan was to cut the floor of the back seat out and sink 22 batteries down where the gas tank use to be.  After some more detailed measuring, I found that I would have to cut out the rear suspension to get that many batteries in due to the rear suspension design of the FWD TT.


Since I like a car with 4 wheels, the new plan is for 15 batteries below the rear seat, the remaining 16 will be in the car basically where the rear seat back was and partly in the luggage area.  Of course plans are subject to change as I get more ideas.  The plan for now is to sink the batteries down into the hole about 10" then put a carpeted cover over the top.  This will give me a place to through my computer bag or a place for the dog to sit.


The next step is to build a steel support for the battery box, then I'm going to have to decide on how to make the battery boxes.